Ompeluhuoneen iso peili on tehty seuraavista materiaaleista:
- peili luomivärirasiasta
- kartonki
- pitsi
- kullanvärinen ja punainen tussi
- liima.
Leikkasin kartongin vähän peiliä suuremmaksi. Väritin kartongin reuna-alueet punaisella värillä. Liimasin peilin kartongille. Väritin pitsin kullanvärisellä tussilla. Liimasin pitsin hieman peilin päälle ja kartonkiin.
I made the big mirror to the sewing room from following materials:
- mirror from the eye make up box
- card
- lace
- gold and red paint maker
- glue.
I cut the card a little larger than the mirror. Then I painted the edges of the card with red colour. After that I glued the mirror on the card. I painted the lace with the gold colour and glued the lace little above the mirror and on the card.
lauantai 27. helmikuuta 2010
Ruusuja, Roses
Posti (Itella) julkaisi jo jonkin aikaa sitten korttisarjan, jonka aiheena ovat ruusut. Tässä yksi korteista IHAILTAVAKSI. Kuvan lähde on Lehtikuva / Martin Ruetschi.
Finland's Mail (Posti, Itella) has published some time ago the set of cards. The subject of these cards are roses. Here is one card to ADMIRE! The photo's source is Lehtikuva / Martin Ruetschi.
perjantai 26. helmikuuta 2010
Ompeluhuoneen matto, The Sewing room's carpet
Ei näin! Yhtenä iltana sain valtavan inspiraation. Nyt pitää tehdä matto. Keräsin yhteen villalankoja, joita minulla sattui olemaan kotona ja ryhdyin työhön. Malli on Sue Hawkinsin kirjasta Embroidered Projects. Loppuvaiheessa olikin reippaasti ongelmia, kun mikään lanka ei tahtonut riittää. Lopputuloksena maton reunat ovat eriväriset!
Not this way! One evening I got an inspiration (a huge one)! Now I want to make a carpet. I took the wool yarns which I had at home and began to work. The pattern is from Embroidered Projects by Sue Hawkins. At the end I had many problems, because there were not enough yarns to finish the carpet. As the result the edging is multicolour.
torstai 25. helmikuuta 2010
Ompelupöytä, The Sewing table
Ompelupöytä on ensimmäinen huonekalu, jonka olen tehnyt nukkekotiin. Ohje on Vivienne Boultonin Nukkekoti-kirjasta. Pöytä on hieman matalampi kuin kirjassa. Olen maalannut ompelupöydän okranvärisellä akryylimaalilla.
The sewing table is the first furniture, which I have made to the dolls' house. The intruction for the table is from Vivienne Boulton's book The Doll's House Decorator. The table is a little bit lower than the instruction says. I have painted the sewing table with ochre acryl paint.
Silityslauta, The Ironing board
Silityslaudan kangasosan olen päällystänyt uudella kankaalla. Jaloista leikkasin runsaat 0,5 mm pois, koska lauta näytti liian korkealta verrattuna muihin huonekaluihin.
I upholstered the ironing board with new fabric. I also cut about 0.5 mm off the legs, because the board was too high compared with other pieces of furniture.
keskiviikko 24. helmikuuta 2010
Ompelujakkara, The sewing stool
Ompelujakkaran olen tehnyt kuohuviinipullon korkinpidikkeestä. Istuinosaan olen virkannut pyöreän pehmusteen. Kiinnitin sen paikoilleen liimalla (muistaakseni Aleene's Tacky Glue).
Alimmassa otoksessa ompelukonepöytä ja jakkara yhteiskuvassa.
The sewing stool I have made from the sparkling wine bottle's cap holder. I crocheted the little circle, which I glued on the seat with Aleene's Tacky Glue.
In the third photo the sewing machine table and the the stool are together.
tiistai 23. helmikuuta 2010
Ompelukone, The Sewing machine
Ompelukonepöytä oli ensimmäisiä miniostoksiani. Pöytä oli mielestäni liian matala. Purin sen osiin ja lisäsin pöytätason alle puulevyn. Muokkasin myös laatikko-osaa. Ruskealla akryylivärillä maalaus ei onnitunut (=KAMALA)! Ompelukoneeseen tein langanpitäjän ja neulan rautalangasta sekä kiedoin pätkän ompelulankaa niihin.
The sewing machine on table was among my first mini purchases. I thought that the table was too low. I took it to pieces and added wood below the table sheet. I added some wood also to the box section. The painting with brown acrylic paint is AWFUL!
To the sewing machine I added from the wire the thread holder and the needle. There is also some thread.
maanantai 22. helmikuuta 2010
Ompeluhuone, The sewing room
Ompeluhuone on Villa Ainon ylimmässä kerroksessa. Kuva on, mitä on. Sivuseinissä on Euro Mini'sin ruusutapetti ja peräseinä on maalattu valkoisella Helmi-kalustemaalilla. Lattialla on harmaanvalkoinen muovimatto. Matto on hyvin pienikuvioinen ja ohut, vaikka tarkoitettu 1:1 mittakaavan matoksi. Mattolistat olen maalannut ruskealla akryylimaalilla. Pieni verhokappa on tehty niin, että puukappaleen päälle on ensin liimattu nauhaa ja sitten päälle pitsiä.
Villa Aino's sewing room is on the second floor. The photo is bad. On the side walls there are rose wall paper from the Euro Mini's collection. The back wall has painted with furniture paint. On the floor is gray-white plastic carpet. It's pattern is very small and the carpet is thin although it is scale 1:1. The mouldings I have painted with dark brown akrylic paint. The pelmet is a wood piece covered with braid and lace.
Tunnisteet:
materiaalit,
materials,
ompeluhuone,
sewing room
lauantai 20. helmikuuta 2010
Kukkalaatikoita, Flower boxes
Villa Ainon kukkalaatikot ovat vaihdettavissa. Koukut tein pullonkaulusmetallista. Yhteen tuli jopa kirjaimia, kun materiaali kävi niin vähiin. Tein myös muutaman vaihtolaatikon.
I can change Villa Aino's flower boxes. The hooks I made of bottle collar metal. One hook has even letters, because I had so little that material. I made also some extra boxes.
perjantai 19. helmikuuta 2010
Tarttuvaa, Infectious
Tarttuvaa
Täällä ei ole siivottu.
Täällä ei ole laitettu ruokaa.
Työpöydän ääressä istuu nainen, joka ei ole kammannut hiuksiaan.
Työpöytää valaisee kaksi valaisinta.
Nainen on istunut samassa asennossa monta tuntia.
Hänellä on suurennuslasi ja pinsetit.
Hänellä on sormissa liimaa.
Hän tekee jotakin ...
Voi tavaton! APUA! N1K1-virus on iskenyt tänne!
Infectious
Here has not cleaned.
Here has not made food.
Behind the desk sits a woman, who has not done her hair.
Two lamps lights the desk.
The woman has sat in the same position hours.
She has the magnifying glass and the tweezers.
She has glue on her fingers.
She is doing something ...
Oh dear! HELP! The D1H1-virus has attacked here!
Viirivehka, The bog arum
Nukkekotiyhdistyksen lehti, The Dolls' House Society's magazine
torstai 18. helmikuuta 2010
Ikkunaluukkujen valmistus, Making shutters
Materiaaleina ikkunaluukkuihin käytin spaatteleita, listaa (puretettu Tiimarin pöytätabletista) ja ohuenohutta vaneria sekä metallilevyä. Metallilevy on pullonkorkeista ja -kauluksista.
Leikkasin spaattelista ikkunaluukun keskiosan ja listasta kehykset. Veistin listojen takaosiin pienet lovet saranoille. Saranat leikkasin pullometallista metallileikkurilla ja taivutin muistuttamaan saranoita. Liimasin kaikki osat vanerille. Saranat eivät ole toimivat! Lakkasin luukut kolmeen kertaan.
Lopuksi liimasin pienet tukilistat luukkujen ja seinän väliin. Näin luukut pysyvät tukevasti paikoillaan. Luukut on siis liimattu ikkunalistaan ja noihin tukipaloihin.
The materials of the shutters are spatulas, strip wood, very thin veneer plywood and metal from bottle caps and collars.
I cut the middle part of the shutter from the spatulas. From the strip wood I made the frames. I cut small parts off the frames so there are paces for the hinges. The hinges I made from the bottle metal. I glued all those parts on veneer plywood. Hinges don't work! I lacquered the shutters three times.
I glued support parts from wood between the shutter and the wall. Only after that the shutters were firmly on their surfaces. The shutters detached when they were glued only on the window mouldings.
Tunnisteet:
ikkunaluukut,
materiaalit,
materials,
shutters
Ikkunaluukut, Shutters
Ihailen saksalaisia ja sveitsiläisiä vuoristotaloja, joissa on ikkunaluukut ja kauniit kukkalaatikot. Luukut ja laatikot oli pakko saada Villa Ainoon.
I admire the mountain houses from Germany and Switzerland. Those houses have the shutters and beutiful flower boxes. It was the must to have them to Villa Aino.
keskiviikko 17. helmikuuta 2010
Työkaluja, Some tools
Minulla on muutamia työkaluja puutöitä varten. Ensimmäisiä hankintojani olivat alumiininen jiiriboksi ja saha. Edelleenkään en tahdo saada oikein kaunista jälkeä niiden avulla.
Sitten hankin amerikkalaisen leikkurin. Sen nimi on Easy Cutter Ultimate. Vaikka laite näyttää kummalliselta, SE ON TODELLA HYVÄ! Erilaisten ohuiden listojen ja erilaisten kulmien aikaan saaminen on sillä erittäin helppoa. Valitettavasti työkalu ei ole aivan halpa hankinta.
I have several tools for wood working. Among my first deliveries was aluminium mitre box and razor saw. I have used them quite a lot, but it is difficult to get good work quality with them.
Then I bought the American cutter. Its name is Easy Cutter Ultimate. Although the device looks unusual, IT IS REALLY GOOD. It makes sharp, clean cuts and precise angles. You can cut thin strip wood, mouldings etc. The only problem with this tool is that it is not cheap.
maanantai 15. helmikuuta 2010
Ulko-ovi, Out door
Villa Ainon ulko-ovi tuli talopaketin mukana. Se oli alun perin peiliovi ja väriltään tummanruskea. Irrotin peilit = ohuet levynpalat. Sahasin ja veistelin kaksi ikkuna-aukkoa. Suunnittelin ikkunoihin "Tiffany-laseja". Tein erilaisilla tusseilla muovikalvolle monenlaisia kokeiluja, mutta en saanut mieleistäni lopputulosta. Lopulta päädyin monen tunnin työn jälkeen liimaamaan ohuelle muovilevylle paperiservietin kuvakerroksen. Kaukana alkuperäisestä ajatuksesta, mutta eteiseen tulee nyt kuitenkin paremmin valoa.
Postiluukku ja oven nupit ovat Euro Mini'sin valikoimista.
Villa Aino's out door was one part of the kit. It was paneled and dark brown. I took off the panels and cut two window openings. I planned "Tiffany glasses" for the windows. I made experiments with different kind of drawing inks, but the results were not good. At last after three hours of work I ended to glue on thin plastic sheet pieces of napkin. This is far away from the orginal idea, but at least the hall has now more light.
The post box and the door knobs are from Euro Mini's collection.
Lue ja naura!, Read and laugh!
sunnuntai 14. helmikuuta 2010
Ikkunat , Windows
Ainon ikkunoiden "lasitus" oli valtava työ. Miksi näin? Ensinnäkin en ollut koskaan aikaisemmin tehnyt tällaista hommaa. Toiseksi minulla oli käytössä muovilevyä, joka oli 2.0 mm paksua. Se oli aivan liian paksua, joten sitä oli vaikea sahata siististi.
Ikkunoiden ulkopuitteet olivat seinälevyissä valmiina, joten niitä minun ei tarvinnut tehdä. Liimasin ensin muovinpalat ikkuna-aukkoihin. Työ oli suttuista. Sitten alkoi kaikkien sisäpuolisten ikkunalistojen väkertäminen.
Kun olin saanut sisäpuolten listat paikoilleen, huomasin, että ne näkyvät rumasti ulkopuolelta. Ei auttanut muu kuin kiinnittää liimataustaisesta etikettipaperista listat ikkunamuovien ulkopuolelle.
Muovin paksuuden kanssa kannattaa siis olla tarkkana. Euro Mini'sin valikoimissa on 0.3 mm paksuista akryylilevyä. Sitä voi leikata saksilla. Kun on tarkkana, voi ikkunamuoviksi sopivaa materiaalia löytää pakkauksista. Kun se on tukevaa, mutta kuitenkin vielä saksilla leikattavissa, niin se on passelia.
The WORK to glaze Villa's windows was HUGE. First I had not done this kind of work. I had acrylic sheet, which was 2.0 mm thick. It was too thick. It was really hard to saw or cut.
The outside mouldings were glued to the walls. So this part was ready. First I glued the plastic sheets into the window holes. Applying the glue was really messy. After that I made all the inside window mouldings.
When finally all the inside mouldings were in right places, I noticed that they were ugly visible outside! The only possibility was to glue paper strips to the windows to hide that ugliness.
It is wise to find acrylic sheets that are not too thick. In the Euro Mini's catalogue there is acrylic sheets, which are 0.3 mm thick. You can cut them with scissors. You can also find really good plastic sheets from packages. I made my roof windows from that kind of material (I made them much later than rest of the windows, so I have learnt something!). When the plastic is thick enough but can still be cut, it is good.
perjantai 12. helmikuuta 2010
torstai 11. helmikuuta 2010
Katto, Roof
Katto muodostuu neljästä palasta. Kappaleet eivät sopineet yhteen kovinkaan hyvin. Katon saaminen talon päälle oli konstikas homma. Sahasin ja talttasin pieniä kappaleita useista eri kohdista, ennen kuin osat alkoivat sopimaan paikoilleen. Kiinnitin katon liimalla ja nauloilla (ruuvaaminen ei onnistunut!) Kitillä viimeistelin pienimmät kolot.
Onneksi ennen lopullista kiinnitystä huomasin, että ullakon pikkuhuoneet kaipasivat lisää valoa. Tein kattoon kaksi ikkunaa. Taas siis sahasin, talttasin ja veistelin. Lopulta sain valmiiksi jonkinlaiset suorakaiteen muotoiset ikkuna-aukot.
Talon katto oli valmiiksi maalattu. Halusin kuitenkin sävyn hieman punaruskeammaksi. Pyyhin pinnat ensin Maalarinpesulla (pullon ohjeen mukaan!) ja maalasin sitten akryylivärillä. Valkoisen silotteen peittoon maalaus vaati 4-5 kerrosta maalia.
The roof is made of four parts. They didn't fit together well. It was quite difficult to get the roof over the house. I had to saw and chisel many slices off before every part began to fit. I used glue and nails to fasten the roof (screws didn't work!) With plaster I filled the gaps.
I was lucky that I noticed before the final glueing and nailing, that the attic's small rooms needed more light. I made two roof windows with saw, chisel and knife. It wasn't easy to get two rectangular openings with those tools.
Dolls' house kit's roof parts were painted, but I liked more redbrownish shade, so I washed the surfaces with chemical solution and painted new colour with acrylic paint. The plaster areas needed 4-5 paint layers.
keskiviikko 10. helmikuuta 2010
Lisää mittoja, More measures
Huonekorkeudet vaihtelevat eri kerroksissa. Alakerrassa korkeus on 22,5 cm, keskikerroksessa 21,5 cm ja ullakolla harjan alla n. 20,0 cm.
Ylimmän kerroksen sisustaminen on ollut haaste. Huoneet ovat pieniä ja katto matalalla.
Room heights are not similar on different floors. On the ground floor the height is 22,5 cm. On the first floor it is 21,5 cm and on the second floor 20,0 cm (the highest point).
On the attic the rooms are small and low. It has been a challenge to furnish them.
Mittoja, Measures
tiistai 9. helmikuuta 2010
Ulkoseinät, Exterior walls
Yksitoikkoinen kuva Villa Ainon sivuseinästä. Halusin ulkoseiniin vaakalaudoituksen. Päädyin tekemään sen "illuusiona". Nukkisaihion ulkoseinät oli maalattu, mutta väri ei ollut mieluinen.
Hioin ensin seinäpinnat karheammiksi. Sitten maalasin ne kahteen kertaan Plaidin Antikkivalkoisella. Maalin kuivuttua piirsin vaakaviivat ensin lyijykynällä. Sitten varjosin viivat keltaisella ja keskiruskealla puuvärikynällä. Viivojen väli on 1,0 cm. Lopuksi vielä lakkasin seinät pari kertaa.
Monotonous picture of Villa's side wall. I planned to the exterior walls horizontal weatherboarding, but I didn't want to build it so I painted it as "an illusion".
The kit's exterior walls were painted, but the colour was wrong. I smoothed the surfaces with sandpaper and painted them with Plaid's Anitque White. When the paint was dry I drew the lines with pencil. After that I shadowed the lines with yellow and brown pencil. The distance between the lines is 1,0 cm. After all the drawing I varnished the walls two times.
maanantai 8. helmikuuta 2010
Villa Ainon toinen puoli, Villa Aino's back side
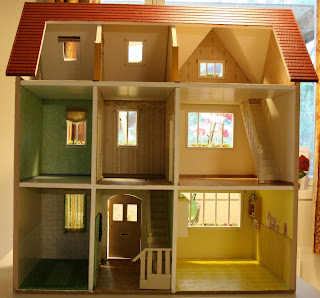
Villa Ainon toinen puoli on avoin. Yläkerroksessa on vasemmalta oikealle ompeluhuone, vierashuone ja makuuhuone. Keskikerroksessa on työhuone, halli ja olohuone (oikealla). Alakerroksessa on ensimmäisenä vasemmalla kylpyhuone, sitten eteishalli ja keittiö.
The back side of the dolls' house is open. On the second floor (from left to right) is the sewing room, the quest room and the bedroom. On the first floor there is the study / workroom, the hall and the living room. On the ground floor you can find the bathroom, the entrance hall and the kitchen.
Villa Ainon ensiesiintyminen, The Dolls' House Villa Aino
Hei!
Aloitan tämän nukkekotiblogin pitämisen esittelemällä nukkekoti Villa Ainoa. Blogiin saattaa välillä hupsahtaa muutakin kuin nukkisasiaa, koska esim. monenlaiset käsityöt ovat lähellä sydäntäni.
Ostin Villa Ainon aihion vuonna 2004. Aloitin innolla rakentamisen, mutta työn suuritöisyys yllätti minut. Aihio itsessään oli melkoinen murheenkryyni. Kerron siitä myöhemmin.
Pari vuotta sitten innostuin nukkistelusta uudelleen. Hyvä nettiyhteys ja upeiden nukkisblogien löytyminen saivat minut ottamaan Villa Ainon uudelleen painiotteeseen. Tulostakin alkoi vähitellen syntyä.
Hi!
I start this dolls' house blog by introducing the dolls' house Villa Aino. From time to time I may show other needleworks, which I have made.
I bought the parts to this dolls' house in 2004. I was very eager to make this dolls' house ready, but I didn't have the lightest idea how much work it needed. So I left it to wait better times.
Two years ago I started again. Good Internet-connection and other people's great dolls' house blogs made me to build Villa Aino again. Little by little I got some results.
Tuiteli
Tilaa:
Blogitekstit (Atom)